Trust Fund
Municipal
Trust Fund Information
Payments
in Lieu of Construction
Adding
or Removing Items to or From a List
What is a Trust Fund?A Municipal Trust Fund is a bank account earmarked for affordable housing that contains revenue collected and held by a municipality. The municipality establishes an income source for the Trust Fund by adopting a Development Fee Ordinance. This ordinance, which must be approved by COAH or the courts, allows the municipality to collect fees from developers who are building in the municipality. The income from these fees is deposited in an interest bearing bank account. COAH monitors Trust Funds to ensure that the municipalities are collecting the fees, maintaining their bank accounts, and spending the revenue in accordance with their COAH-approved Development Fee Ordinances and Spending Plans. |
Trust Fund Report Preparer TasksMunicipalities have the ability to enter Trust Fund information directly into the CTM System. A municipal staff member assigned the CTM Role of External Affordable Housing Trust/Spending Plan Monitor (Trust Fund Report Preparer) performs these tasks. Contact the COAH Affordable Housing Trust/Spending Plan Monitoring Help Desk (609-633-9575) to have one of your municipal staff members assigned the appropriate Role in CTM. |
|
The Trust Fund Report Preparer will be responsible for entering information into CTM regarding� - Collection and expenditure of development fees - Payments in lieu of construction - Barrier free escrow funds - Other funds as they relate to the municipal affordable housing trust fund This may include reporting expenditures for��������� - Housing activity - Affordability assistance - Administrative costs as they relate to the projects and programs included in the municipal Fair Share Plan and Spending Plan |
Municipal Trust Fund Information |
|
After a Resolution Approving a Development Fee Ordinance is signed by COAH�s Executive Director, COAH administrative staff members enter information about your Trust Fund into the CTM System. You will be responsible for entering selected information (see Trust Fund Report Preparer Tasks, above) about your municipality�s Trust Fund. |
|
The CTM System collects information as transactions are added or edited, including the Date � Time of the entry, the User Name of the person making the entry, the Category of the entry (income or expenditures), the Type of entry, and Comments. When transactions are initially added, the CTM System automatically records �Add New� in the Monitoring Comment field. When transactions are edited, you must describe the edit in the Comments text box (otherwise, you cannot save the transaction). This information helps to provide an audit trail of changes. A Trust Fund Transaction Detail Report can be generated using the CTM Reports feature. |
|
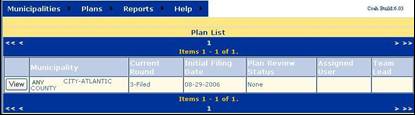
From the Navigation Bar |
To access the Trust Fund screens� � In the Navigation Bar, hover your cursor over Plans and click List
|
|
At the Plan List |
� Click the View button
You will be brought to your Plan Header. |
|
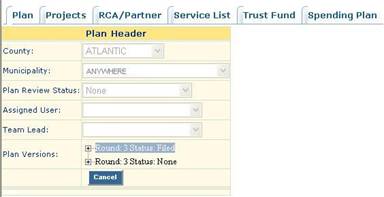
At the Plan Header (or any Plan Screen) |
� Click the Trust Fund index tab
|
|
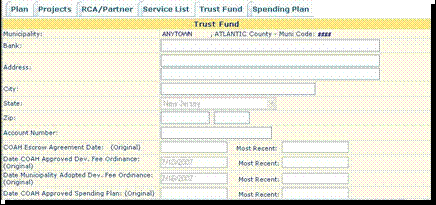
Trust Fund Screen |
Review the information that COAH has entered for your Trust Fund. If you notice any discrepancies or if you have concerns, email COAH coahadmin@dca.state.nj.us or call the COAH Affordable Housing Trust/Spending Plan Monitoring Help Desk (609) 633-9575. |

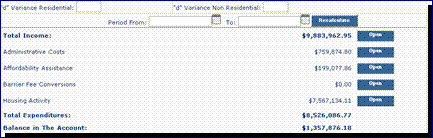
Total income |
|
|
At the bottom of the Trust Fund screen |
� Click the Open button for Total Income to display the Fee Collection Summary screen
|
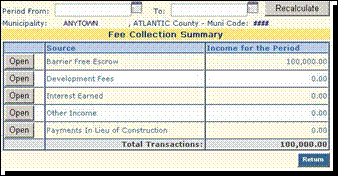
Fee Collection Summary |
|
|
At the Fee Collection
Summary Screen |
The optional Period From and To feature is available for this screen. �
To View, Edit, or Add information to any of
the Sources, click its Open button
|
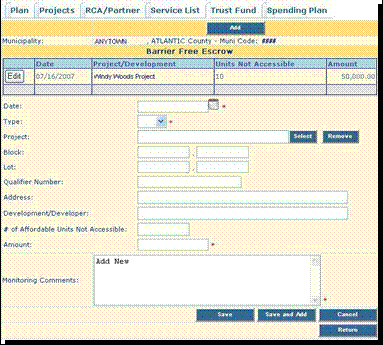
Barrier Free Escrow |
|
|
At the
Barrier Free Escrow Screen |
� Click Add to enter a new Barrier Free Escrow item � Click an item�s Edit button to modify it
|
|
Date |
� Enter the Date that the income was received |
|
Type |
� Select N/A from the Type drop down list |
|
Project |
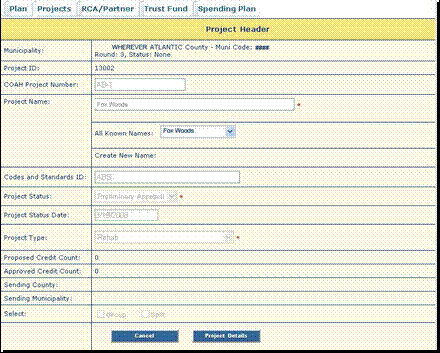
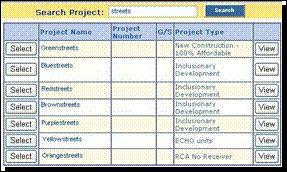
� Click the Select button to open a pop-up screen to find the Project that generated the income |
|
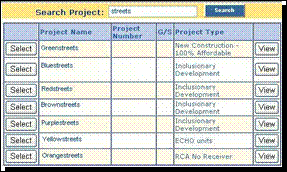
Select Project |
� Click the Select button for the desired Project � If the desired Project does not appear on the list, Search for it � If you still do not find the project, contact the COAH Affordable Housing Trust/Spending Plan Monitoring Help Desk (609) 633-9575.
|
|
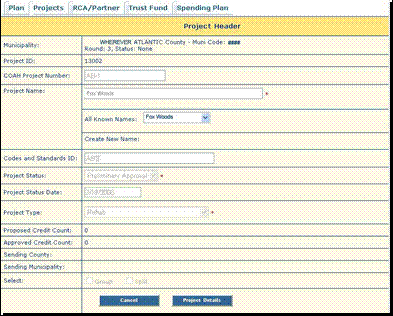
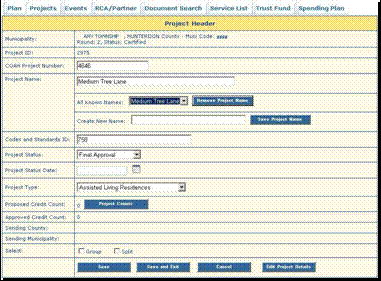
View Project (Optional) |
To make sure you have selected the correct Project, you may click the View button to go to the Project Header Screen, where you can use the View Project Details button to get to the Project Detail Screen.
|
|
Block, |
� Generally, you do not need to enter the Block, Lot and Qualifier Number for this category unless the project could not be selected from the list |
|
Address |
� Generally, you do not need to enter the Address for this category unless the project could not be selected from the list |
|
Development / Developer |
� Generally, you do not need to enter the official name of the Development firm or Developer for this category unless the project could not be selected from the list |
|
# of Affordable Units Not
Accessible |
� Enter the number of affordable units in the project that are not handicap accessible and can be converted to handicap accessible using the funds deposited |
|
Amount |
� Enter the Amount that was received |
|
Monitoring Comments |
� Add Monitoring Comments � Save or Save and Add |


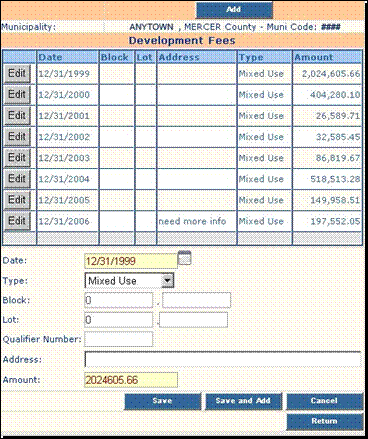
Development Fees |
|
|
At the Development Fee
Screen |
� Click Add to enter a new Development Fee item � Click an item�s Edit button to modify it
|
|
Date |
� Enter the Date that the Development Fee was received |
|
Type |
� Select Mixed Use, Residential, Non-Residential, Stimulus Act Refund (issued by the municipality to a developer, enter as a negative), or Stimulus Act State Funds (issued to the municipality from the State for reimbursement of refund to developer) from the Type drop down list |
|
Block, |
� Enter the Block, and Lot and Qualifier Number |
|
Address |
� Enter the Address |
|
Amount |
� Enter the development fee Amount � Save or Save and Add |
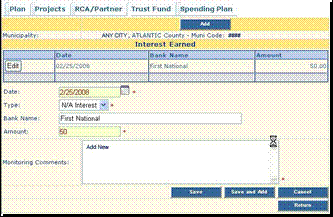
Interest Earned |
|
|
At the Interest Earned
Screen |
� Click Add to enter a new Interest Earned item � Click an item�s Edit button to modify it
|
|
Date |
� Enter the Date that the Interest was received |
|
Type |
� Select N/A Interest from the Type drop down list |
|
Bank Name |
� Enter the Bank Name |
|
Amount |
� Enter the Amount of Interest Earned |
|
Monitoring Comments |
� Add Monitoring Comments � Save or Save and Add |
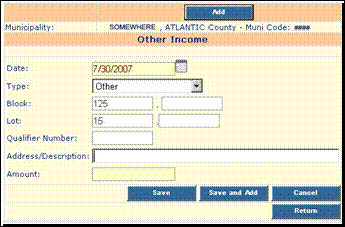
Other Income |
|
|
At the Other Income screen |
� Click Add to enter a new Other Income item � Click Edit to modify an item
|
|
Date |
� Enter the Date that the Other Income was received |
|
Type |
� Select the Type of Other Income received (grants, loan repayments, other, recapture, rent or unit sales) from the drop down list |
|
Block, |
� Enter the Block, and Lot and Qualifier Number |
|
Address /Description |
� Enter the Address or Description, especially if the Type "Other" was selected |
|
Amount |
� Enter the Amount of other income � Save or Save and Add |
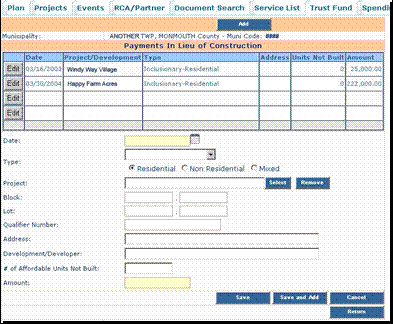
Payments in Lieu of Construction |
|
|
At the Payments in Lieu of
Construction Screen |
� Click Add to enter a new Payment in Lieu of Construction item � Click Edit to modify an item � |
|
Date |
� Enter the Date that the Payment in Lieu of Construction was received |
|
Type |
� Select the Type from the drop down list (Growth Share Ordinance or Inclusionary) � Select the applicable radio button (Residential, Non-Residential or Mixed) |
|
Project |
� Click the Select button to open a pop-up screen to find the Project that generated the income |
|
Select Project |
� Click the Select button to choose the desired Project (if it�s on the current list) � If the desired Project does not appear on the list, Search for it � If you still do not find the project, contact the COAH Affordable Housing Trust/Spending Plan Monitoring Help Desk (609) 633-9575.
Be sure that the Project Type is consistent with the Type you selected in the previous screen. For example, if you select Growth Share Ordinance as the Type, Growth Share Ordinance should be selected from the Project list. |
|
View Project (Optional) |
To make sure you have selected the correct Project, you may click the View button to go to the Project Header Screen, where you can click the View Project Details button to get to the Project Detail Screen.
|
|
Block, |
� Generally, you only need to enter the Block, Lot and Qualifier Number when the Type Growth Share Ordinance is selected, or if the Inclusionary project is not on the Project list |
|
Address |
� Generally, you only need to enter the Address when the Type Growth Share Ordinance is selected, or if the Inclusionary project is not on the Project list |
|
Development / Developer |
� Generally, you only need to enter the name of the Development firm or Developer when the Type Growth Share Ordinance is selected, or if the Inclusionary project is not on the Project list |
|
# of Affordable Units not
Built |
� Enter the number of affordable units that are not being constructed within the development and can be built elsewhere using the funds deposited |
|
Amount |
� Enter the Amount of the payment in lieu of construction � Save or Save and Add |

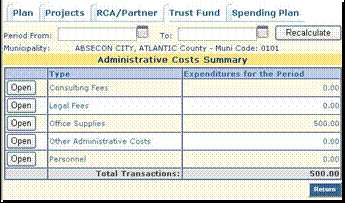
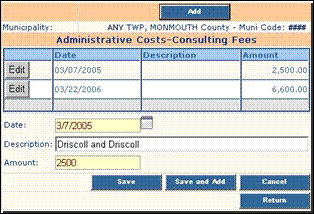
Administrative Costs |
|
|
At the Administrative Costs
Summary Screen |
The optional Period From and To feature is available for this screen. The Administrative Costs categories are listed. To add or edit Types of expenses― � Click the Open button for the appropriate category
|
|
At the Administrative Costs
Screens |
Each type of Administrative Cost has an identically formatted screen that allows you to enter individual expenses. � Click the Add button to enter a new expense � Click an item�s Edit button to modify an existing expense
|
|
Date |
� Enter the Date that the Administrative Cost was disbursed |
|
Description |
� Enter a Description of the expense as follows: Consulting Fees and Legal Fees: Provide the name of the firm/organization and a brief description fo the services rendered Office Supplies: Provide a description fo the supplies as related to the implementation of the affordable housing plan Other Administrative Costs: Provide a detailed description Personnel: Provide the name/title of the person compensated |
|
Amount |
� Enter the Amount of the expense � Save or Save and Add |
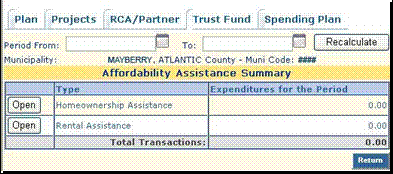
Affordability Assistance |
|
|
At the Affordability
Assistance Summary Screen |
The optional Period From and To feature is available for this screen. � Click the Open button for the appropriate Type of Affordability Assistance (Homeownership or Rental) you are recording . |
|
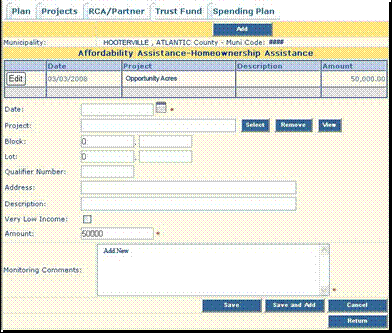
At the Affordability
Assistance � Homeownership or Rental Assistance Screen |
Each Affordability Assistance Type (Homeownership Assistance or Rental Assistance) has an identically formatted screen that allows you to enter individual expenses. � Click Add to enter a new Affordability Assistance expense � Click Edit to modify an existing expense � Enter the Date that the Affordability Assistance expense was disbursed
|
|
Project |
� Click the Select button to open a pop-up screen to find the Project that received assistance |
|
Select Project |
� Click the Select button for the desired Project � If the desired Project does not appear on the list, Search for it � If you still do not find the project, contact the COAH Affordable Housing Trust/Spending Plan Monitoring Help Desk (609) 633-9575.
|
|
View Project (Optional) |
To make sure you have selected the correct Project, you may click the View button to go to the Project Header Screen, where you can use the View Project Details button to get to the Project Detail Screen.
|
|
Block, |
� Enter the Block, and Lot and Qualifier Number, unless the assistance provided is for the project as a whole, not an individual unit, and the Project was selected from the Project list |
|
Address |
� Enter the Address of the household or project, unless the assistance provided is for the project as a whole, not an individual unit, and the Project was selected from the Project list |
|
Description |
� Enter the Description of the Affordability Assistance expense |
|
Very Low Income |
� Click the checkbox if the affordability assistance was received by a Very Low Income household (for income limits, see www.nj.gov/dca/coah/incomelimits.pdf. |
| Type | · Select the appropriate radio button to indicate whether the assistance provide was a Loan or a Grant |
|
Amount |
� Enter the Amount of the Affordability Assistance expense � Save or Save and Add |
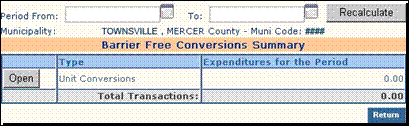
Barrier Free Conversion |
|
|
At the Barrier Free
Conversion Screen |
The optional Period From and To feature is available for this screen. � Click the Open button to access Unit Conversions
|
|
|
� Click Add to enter a new Barrier Free Conversion expense � Click Edit to modify an existing expense
|
|
Date |
� Enter the Date that the expense was disbursed
|
|
Project |
� Click the Select button to open a pop-up screen to find the Project where the converted unit is located |
|
Select Project |
� Click the Select button for the desired Project � If the desired Project does not appear on the list, Search for it � If you still do not find the project, contact the COAH Affordable Housing Trust/Spending Plan Monitoring Help Desk (609) 633-9575.
|
|
View Project (Optional) |
To make sure you have selected the correct Project, you may click the View button to go to the Project Header Screen, where you can use the View Project Details button to get to the Project Detail Screen.
|
|
Block, |
� Enter the Block, and Lot and Qualifier Number
|
|
Address |
� Enter the Address of the converted unit |
|
Description |
� You do not need to enter a Description of the Barrier Free Conversion expense |
|
Amount |
� Enter the Amount of the expense � Save or Save and Add |

Housing Activity |
|
|
At the Housing Activity
Summary Screen |
The optional Period From and To feature is available for this screen. � Click the Open button for the desired Type
|
|
At the Housing Activity �
Type Screen |
Each Housing Activity Type has an identically formatted screen that allows you to enter individual expenses � Click Add to enter a new Housing Activity expense � Click Edit to modify an item
|
|
Date |
� Enter the Date that funds were dispersed |
|
Project |
� Click the Select button to open a pop-up screen to find the Project/RCA/Partnership that generated the income |
|
Select Project |
� Click the Select button for the desired Project/RCA/Partnership � If the desired Project does not appear on the list, Search for it � If you still do not find the project, contact the COAH Affordable Housing Trust/Spending Plan Monitoring Help Desk (609) 633-9575.
|
|
View Project (Optional) |
To make sure you have selected the correct Project, you may click the View button to go to the Project Header Screen, where you can use the View Project Details button to get to the Project Detail Screen.
|
|
Block, |
� Enter the Block, and Lot and Qualifier Number Only required for Accessory Apartments, ECHO, Market to Affordable, New Construction (if funding is unit, not project, based), Purchase of Existing Units, and Rehabilitation |
|
Address |
� Enter the Address Only required for Accessory Apartments, ECHO, Market to Affordable, New Construction (if funding is unit, not project, based), Purchase of Existing Units, and Rehabilitation |
|
Description |
� Enter the Description of the Housing Activity expense |
|
Amount |
� Enter the Amount of the expense � Save or Save and Add |
Monitoring Activity Reports |
|
|
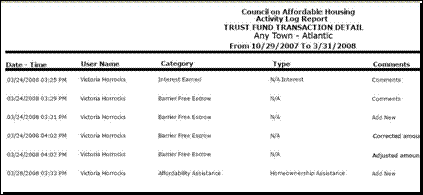
One of the monitoring reports that can be produced by the CTM System is Trust Fund Transaction Details. The report provides information on all the changes made to Trust Fund accounts, including the Date and Time, User Name, Category, Type, and Comments. |
|
|
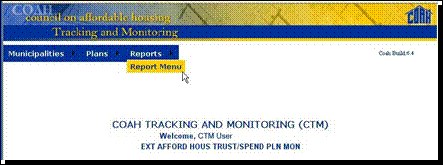
At the Navigation Bar |
To generate the Activity Log Report - Trust Fund Transaction Details� � Hover your cursor over Reports and click Report Menu
|
|
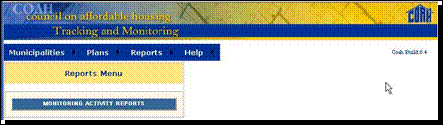
At the Reports Menu |
� Click the Monitoring Activity Reports button
|
|
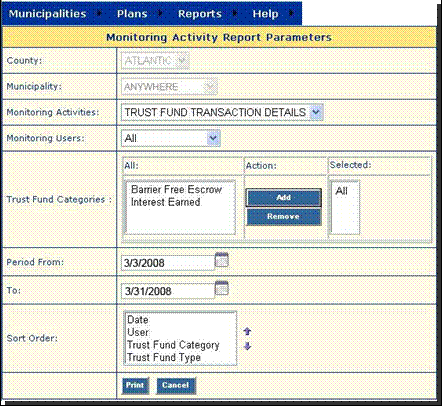
At the Monitoring Activity
Report Parameters Screen |
� Select �Trust Fund Transaction Details� from the Monitoring Activities pull down list � Choose the name of the desired user or select �All� from the Monitoring Users pull down list � Select the category(s) for the report in the Trust Fund Categories field � Enter the starting date for the report in the Period From field � Enter the ending date for the report in the To field � To modify the order of the column headings in your report� - Highlight a Sort Order item - Use the up � and down � arrow keys to select its position in the report
|
|
Printing the Report |
� Click the Print button The Trust Fund Transaction Detail report will be displayed
To produce a hard copy of the report� � Right-click anywhere on the report � Click Print in the Windows menu box � Follow your regular Windows or Macintosh Print procedures |
Definitions |
|
Period From - To |
To determine the dollar amounts for a specific date range, enter the start (Period From) and end dates (To) for the desired date range. Click Recalculate If you enter a Period From date only (with no Period To date), and click the Recalculate button, the resultant recalculation will be based on the Period From date to the current date. If you enter the Period To date only (with no Period From date), and click the Recalculate button, the recalculation will be based on all Income and Expenditures up to the Period To date entered. |
Project Search |
Enter the Project Name or partial
name. The easiest way to search is to enter only enough of the name to get
the results you want. You can use a partial name (for example, �Spring� will
find |
Monitoring Comments |
When you Add a Trust Fund transaction, the CTM System will automatically insert the text �Add New� in the Monitoring Comments field. When you Edit that transaction, the Monitoring Comments field will be empty, any you will be required to enter comments about the changes you made to the transaction � otherwise you won�t be able to Save the transaction. |
Save Button |
To add the data you have entered� � Click Save Certain fields must be completed. If you click Save, Save and Add, or Save and Exit, you may be prompted to provide information in these required fields. Required fields are marked with an asterisk (�) When you save successfully, a Data Saved Successfully message is displayed. If you have left a required field empty, a Required Field message will be displayed next to the field that needs to be completed. |
Save and Add Button |
To save the data you have entered and begin a new entry� � Click Save and Add |
Date Format |
All dates must be entered with a four digit year � example: 1/11/2007. Use the calendar option to avoid data entry errors. |
Adding or Removing Items to or From a List |
Adding Items � Highlight the item in the All column (to highlight more than one item at a time, hold down the Ctrl key and click on each of the desired items) � Click the Add button in the Action column The selected items will appear in the Selected column Removing Items � Highlight the item in the Selected column (to highlight more than one item at a time, hold down the Ctrl key and click on each of the desired items) � Click the Remove button in the Action column The selected items will appear in the All column
|
