Projects
What are Projects? |
|
Projects (comprised of affordable housing units) are the major element of a municipality�s Fair Share Plan (Plan) and provide Credits that help satisfy the municipality�s Fair Share Obligation. |
|
|
Project List | |
|
From the Navigation Bar |
To access your municipality�s Project List� � In the Navigation Bar, hover your cursor over Plans and click List
|
|
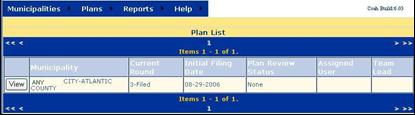
At the Plan List |
� Click the View button
You will be brought to your Plan Header. |
|
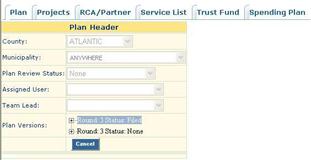
At the Plan Header (or any Plan Screen) |
� Click the Projects index tab
You will be taken to your municipality�s Project List. |
|
At the Project List |
� Scroll down the list to find the desired Project - Click Edit to access the Project Header - Click Detail to access the Project Detail screen - Click Counts to access to Project Counts - Click Units to access Project Units
|

Project Header | |
|
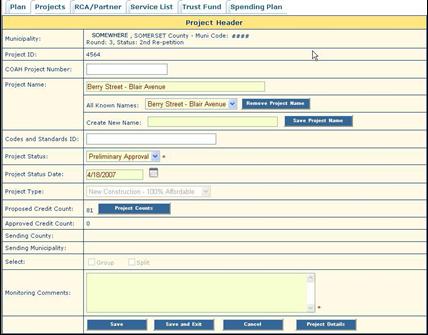
At the Project Header Screen |
The Project Header screen displays current information about the Project. Those that have received authorization for the CTM Role of External Project/Unit Monitoring can add, edit, and/or delete information in the yellow fields. Information in the other fields is entered by COAH staff. Buttons provide additional functions and links to other screens.
|
|
Project ID |
Generated by the CTM system |
|
COAH Project Number |
This number is generated by COAH staff to identify projects that have a connection to each other. |
|
Project Name |
The initial Project Name is entered by COAH staff. To change the name of the Project� � Enter the new name of the Project in the Create New Name field � Click on the Save Project Name button The new name will replace the previous name in the top Project Name field. Current and previous Project Names are stored chronologically in the All Known Names pull down list. To delete a Project Name� � Click on the Remove Project Name button Only remove a project name if the name was entered in error or named incorrectly. Do not remove the name if it was a correct previous name � let the name remain in the list as project history. |
|
Codes and Standards ID |
If available, this number is entered by COAH staff. |
|
Project Status |
� Select the current status of the project from the Project Status dropdown list |
|
Project Status Date |
� Enter the date of the current status |
|
Project Type |
COAH staff selects the Project Type when entering the project into the CTM system. |
|
Proposed Credit Count |
The Proposed Credit Count totals come from the Project Counts screen. To access a breakdown of the Credit Count� � Click on the Project Counts button |
|
Approved Credit Count |
The Approved Credit Count totals come from the Project Counts screen. To access a breakdown of the Credit Count� Click on the Project Counts button |
|
If the project is an RCA or Partnership, the sending municipality�s county appears here. | |
|
Sending Municipality |
If the project is an RCA or Partnership, the sending municipality appears here. |
|
Group or Split |
If the project is a Group or a Split, COAH staff selects the appropriate box. An example of a group and a split is an RCA project that is receiving funding from more than one sending municipality. Information concerning the whole project is recorded in the Group Project. Information concerning the number of units funded by each sending municipality is recorded in the Split Project. In a Group Project, the projects selected as Splits will be displayed and in Split projects, the Group Project will be displayed. (See Group and Split.) |
|
Monitoring Comments |
� Each time you revise this screen, enter an explanation of the changes you have made in the Monitoring Comments text box. |
Project Detail | |
|
Accessing Project Detail |
You can use either of two methods to open the Project Detail screen� � At the Project Header screen, click the Project Details button at the bottom of the page or � At the Project List, click the Detail button for the desired Project |
|
Project Detail Screen |
The Project Detail provides more comprehensive information about a Project and keeps a history of the Project that can be copied to other versions of the municipality�s Plan. If you have received authorization for the External Project/Unit Monitoring CTM Role, you can add, edit, and/or delete information in the yellow fields. COAH staff enters Information in the remaining fields. Buttons provide additional functions and links to other screens.
|
|
Project Detail ID |
This number is generated by the CTM system. |
|
Round Rules Used |
Round Rules are the COAH rules that apply to this project. |
|
Current Version |
This box is checked if this project detail is in the current version of the Plan. |
|
Address |
� Enter the physical address of the Project in the Address field
|
|
Block and Lot List |
The Block and Lot List displays a list of all the Blocks and Lots in the Project. It will be empty until you enter one or more Blocks and Lots, using the Add Block and Lot function, below. � To Edit or Remove a Block and Lot: Select the block and lot of the Project that you wish to edit or remove from the pull down list in the Block and Lot List field. � If you click Edit� - The block and lot will appear in the Add Block and Lot grid - The Add button will change to Save. - Make all necessary changes and click the Save button. � If you click Remove� - The block and lot will be removed from the dropdown list |
|
Add Block, Lot, and Qualifier Number |
Projects may have more than one Block and Lot. The system allows you to enter all Blocks and Lots for the project. To add a Block and Lot� � Enter the appropriate information into the grid � Click the Add button Add additional Project Blocks and Lots, if necessary. Make sure to click Add after entering each entry. |
|
Acreage Amount |
� Enter the Acreage Amount of the Project |
|
Project Sponsor |
� Select the applicable Project Sponsor (municipally developed, non-profit developed, private developer, unknown) type from the drop down list |
|
Project Developer |
� Enter the name of the Project Developer |
|
Planning Region |
� Select the Planning Region(s) |
|
Project Sub Type |
COAH staff selects the Project Sub Type, if applicable |
|
Project Credit Type |
COAH staff selects the Project Credit Type, if applicable |
|
Construction Type |
COAH staff selects the Construction Type. |
|
Flags |
COAH staff selects the appropriate Flags, which supply additional information about the project. |
|
Waiver Text |
If a waiver from COAH rules was requested or granted for the project, COAH staff enters the appropriate information in the Waiver Text field. |
|
Site Visit Date |
COAH staff enters the date of the Site Visit, if applicable. |
|
Market Units |
� Enter the number of Proposed and Completed Market Units
|
|
Condo Fee |
� Enter the percentage of the market rate Association Fee that will be paid by affordable unit owners, if any |
|
Average Range of Affordability |
� Enter the percent of Average Range of Affordability for the project |
|
Hard Costs and Admin Costs |
For rehabilitation or RCA projects� � Enter Hard Costs and Administrative Costs expended |
|
Payment In Lieu/Growth Share Amount |
� Enter the amount of funds collected for the project as a result of a payment in lieu agreement or a growth share ordinance |
|
Payment In Lieu/Growth Share Units |
COAH staff will enter the number of units attributed to the payments. |
|
Funds Committed |
� If applicable, enter the amount of Funds Committed to the project |
|
Funding Sources |
� Select the applicable Funding Sources (one or several) |
|
Effective Date of Affordable Controls |
� Enter the Effective Date of the Affordability Controls |
|
Length of Affordability Controls |
� If applicable, click the Perpetual selection box (no expiration) or � Enter the number of years that Affordability Controls will be in effect The system will calculate the Affordable Date Expires |
|
Date Affordable Controls Removed |
� If applicable, enter the date the affordability controls were removed from the project. |
|
Project Contacts: |
COAH staff enters the names of the Municipal Administrative Agent, Rehab Program Administrative or Administrative Agent. |
|
Low Income Housing Tax Credits (LIHTC) |
If the project received LIHTC, COAH staff enters the information. |
|
Monitoring Comments |
� Each time you revise this screen, enter an explanation of the changes you have made in the Monitoring Comments text box. |
|
Save |
� Save or Save & Exit |
Project CountsProject Counts provide a tally of Proposed Affordable Housing Units (AHUs) according to Prior Round Credits (Proposed, Creditworthy, Approved), Growth Share Credits (Proposed Creditworthy, and Approved), and Actual (AHU) (Completed and Creditworthy) for various categories of housing. The information in this section comes from a municipality�s fair share plan. Project Counts are �view only� to External Users. | ||
|
Accessing Project Counts |
To open the Project Counts screen, at the Project List� � Click the Counts button for the desired Project
Other CTM screens have Project Counts buttons, which allow you to open the Project Counts screen. | |
|
Project Counts Screen |
To access the Project Count Detail screen for any one of the Categories� � Click the Category�s View button
| |
|
Project Count Detail Screen |
The Project Count Detail screens display comprehensive information about each of the Project Count Categories.
| |
|
Proposed AHU |
The number of Affordable Housing Units intended in the Project in the Category | |
|
Prior Round Credits |
Proposed � the number of credits against the prior round obligation requested by the municipality Creditworthy � the number of units determined to be creditworthy under prior round rules Approved � the number of credits approved by COAH for the prior round obligation | |
|
Growth Share Credits |
Proposed � the number of credits against the growth share obligation requested by the municipality Creditworthy � the number of units determined to be creditworthy under Third Round rules Approved � the number of credits approved by COAH for the growth share obligation | |
|
Actual AHU |
The numbers in these fields roll up from the information submitted on the Project Unit screens. | |
|
Monitoring |
These fields are currently blank and will be used by COAH staff after a plan is certified to determine if a municipality is addressing its obligation. | |
UnitsProject UnitsProject Units are the individual units (new construction or rehab) completed in a Project. Add Project Units | ||
|
Accessing Project Units |
To open the Project Units screen, at the Project List� � Click the Units button for the desired Project
Other CTM screens have Units buttons, which also allow you to open the Project Units screen. | |
|
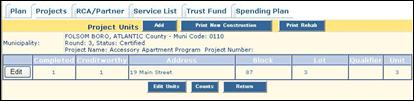
Add Project Units |
If no unit information has been entered, the Project Units screen will display the name of your municipality, Plan version and status, and Project Name (and Number, if applicable), and will say �No data found� in reference to Units. Information must be entered for all completed units in the Project.. � To begin entering Units, click the Add button.
| |
|
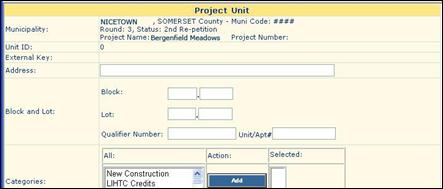
The Project Unit input screen will be displayed. Enter all applicable information.
| ||
|
Unit ID |
Generated by system | |
|
External Key |
Generated by system | |
|
Unit Location |
� Enter the Street Address of the Unit � Enter the Block and Lot � Enter the Qualifier Number � Enter the Unit or Apartment Number | |
|
Categories |
� Select all Categories applicable to this Unit You must select either New Construction or Rehab, in addition to the other categories that apply to this unit � otherwise, you will not be able to Save. | |
|
Flags |
� Select all Flags that are applicable to this Unit | |
|
New Construction |
If this Unit is New Construction (includes conversions and reconstructions), complete the New Construction Units section� � Select the Housing Type from the drop down list � Enter the Building Permit Completion Date � Enter the Certificate of Occupancy Number � Enter the Date that the CO (Certificate of Occupancy) was Issued � Enter the Initial Sale Price or Initial Rent for the Unit � Enter the Affordability % � Enter the Municipal Subsidy Amount, if applicable � Enter the most recent Sale or Transfer Date for this unit | |
|
Rehabilitation Units |
If this is a Rehabilitation Unit, complete the Rehabilitation Units section� � Enter the Final Inspection Date � Enter the Funds Expended on Hard Costs � Enter Development Fees Expended � Enter Funds Recaptured � Select the Systems Repaired (one or several) | |
|
All Units |
Complete this section for all Units in the Project � New Construction and Rehabilitation� � Enter the Date that Affordability Controls went into effect � In the Length of Affordability Controls in Years field, either click the checkbox for Perpetual or enter the length of affordability controls in years. The system will calculate the Date the Affordability Controls Expire if the date the controls went into effect and length of controls are entered. � If Affordability Controls are removed, enter the date in the Date Affordability Controls Removed field | |
|
Comments |
When you initially enter information on a Unit, the Comments field is pre-populated with the words �Add New.� You don�t need to enter anything else in this field � leave it as is. If you make changes to the Unit information on this screen (after the first Save) in the future� � Enter text in the Comments field briefly explaining what was changed and why (standardize your comments) | |
|
Save |
� Save your input | |
Edit Project Units
|
To modify the information in a Project Unit record, at the Project Units screen� � Click the Edit button for the appropriate Project
The Project Unit input screen will be displayed. | |
|
|
� Edit the Project Unit information, as needed � Add Monitoring Comments describing the changes you made � Be sure to Save
|
Duplicating Units
|
Duplicate Units |
If you will be entering information on several Units that have the same basic information, you may use the CTM Duplicate feature. After saving the first Unit� � Click the Duplicate button at the bottom of the page � Enter the number of additional records (units) you wish to create in the pop up box (maximum 25) � Click OK
|
|
At the Project Units Screen |
The screen will display the Units that you created. All of them will have the same information � so you need to Edit each one with any information that is different. � Click the Edit Units button (at the bottom of the screen)
|
|
Modify Duplicate Units |
This screen will allow you to customize each unit by changing the� - Address - Block - Lot - Qualifier - Unit/Apt# The screen will also allow you to add Monitoring Comments to each Unit. � Make the appropriate changes to the information for each Unit � Enter text in the Monitoring Comments field briefly explaining what was changed and why (standardize your comments)
|
|
Save |
� When finished, click the Save Edit button |
|
Edit Units |
To edit information not included on the Project Units list screen� � Click the Edit button for the desired Unit � Modify the Project Unit Information, as needed � Add Monitoring Comments describing the changes you made � Save |
Unit Reports
|
Unit Reports |
To produce a report listing Unit information, at the Project Units screen� � Click the Print New Construction button (if this a new construction project) or � Click the Print Rehab button (if this is a rehabilitation project)
|