Back
to top

Division of Risk Management

Technical Issues - Claim Filing Process and the Claimant Portal

Before reaching out to Risk Management, please ensure to read all of the relevant instructions and related tabs. You will find most, if not all, of the answers to your questions on those tabs.

First, refer to the tab entitled “How to Set Up and Access Your Claim Portal”, and the “FAQ: Navigating the Claim Portal, and other general claim -related issues” tab. Before signing in or bookmarking the login page to view, please ensure to use the Tort Claim Login page found on our website.

Screenshot A illustrates the official Tort Claim Login Page from the website with the correct URL in the address bar. This official website Login page allows you to see all of your claims and entire claims history. Please use this login page to bookmark and save as one of your favorites.

Screenshot B illustrates the login page with a different URL in the address bar (Claim ID), that you will see after clicking on a “Claim Form Link” from a DRM email. Please note that if you log in using the “Claim Form Link” from a claim related email, you will not be able to see your entire claim history or cases. You will see only the particular claim referenced in the subject email from which you accessed the “Claim Form Link”. Please do not use this login page to bookmark or save as one of your favorites.

Please refer to Screenshots below:

Screenshot A

This illustrates the official Tort Claim Login Page from the website with the correct URL in the address bar.
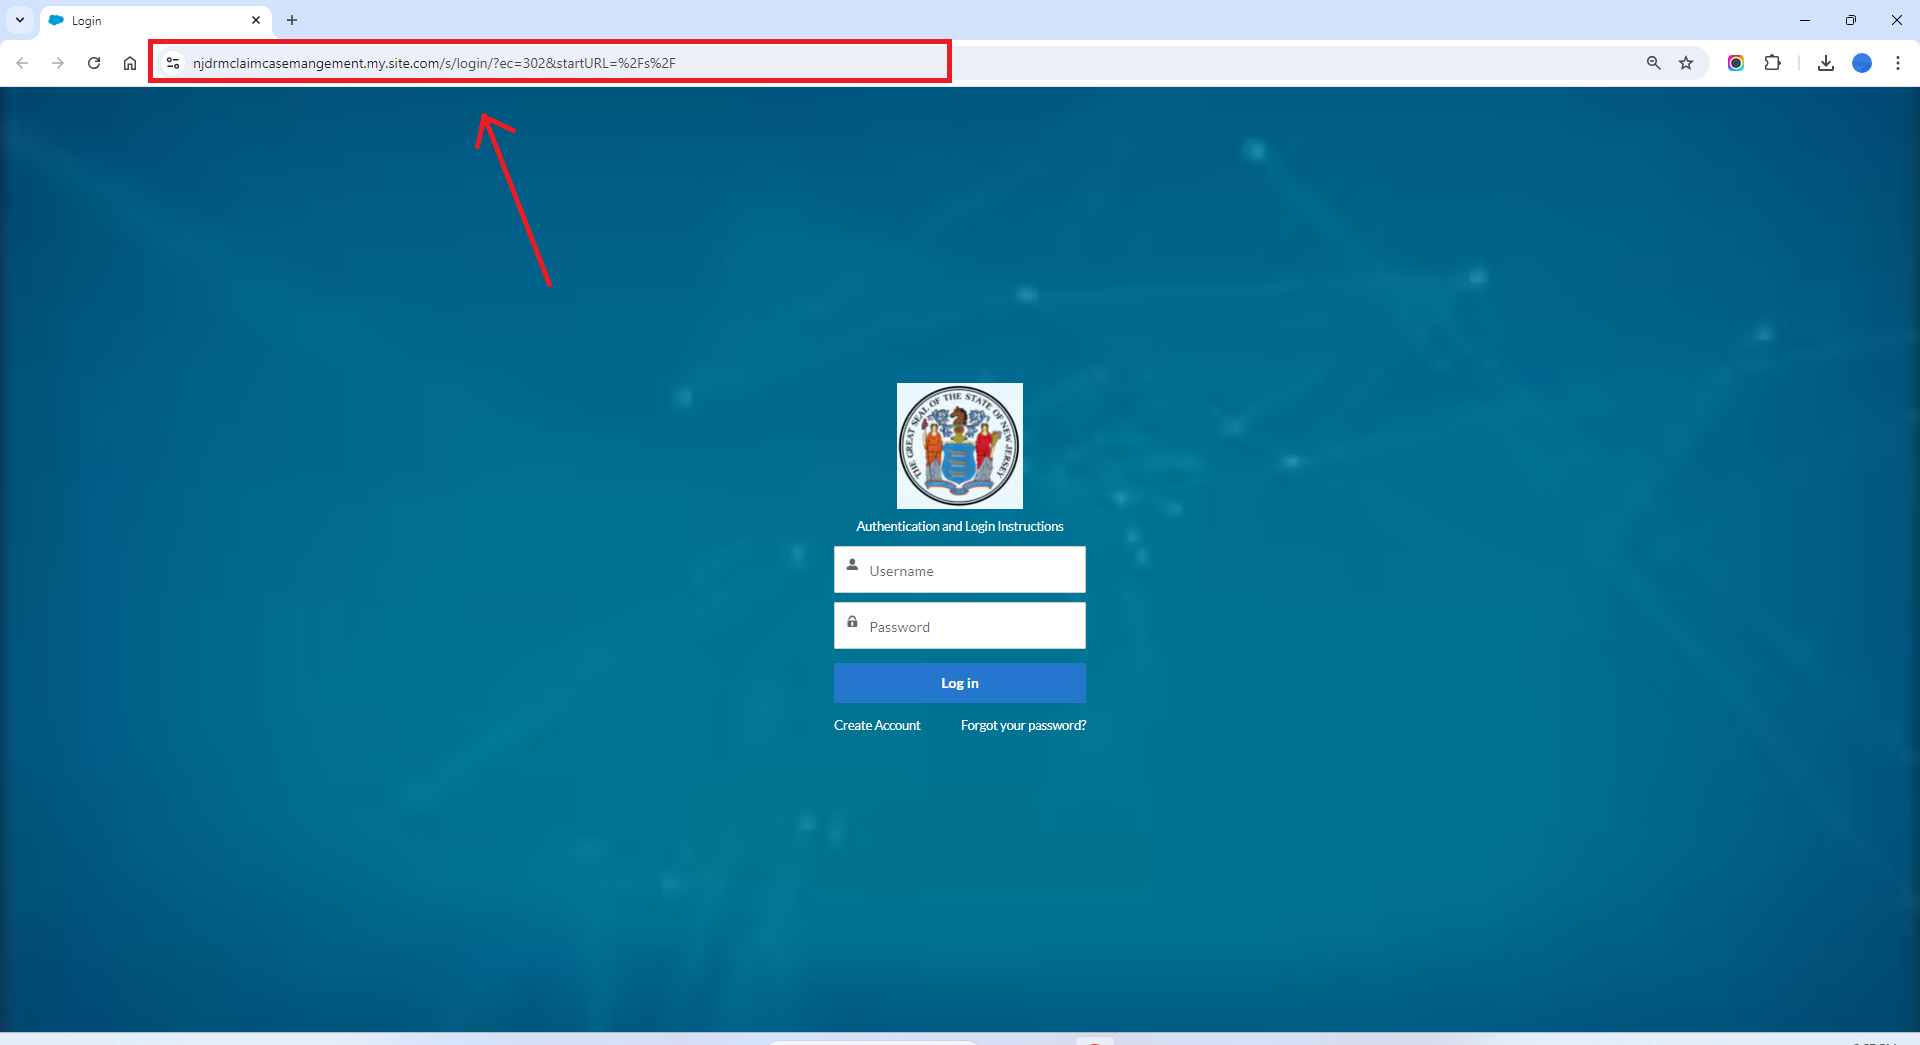
image 1

Screenshot B

This illustrates the login page with a different URL in the address bar (Claim ID), that you will see after clicking on a “Claim Form Link” from a DRM email.
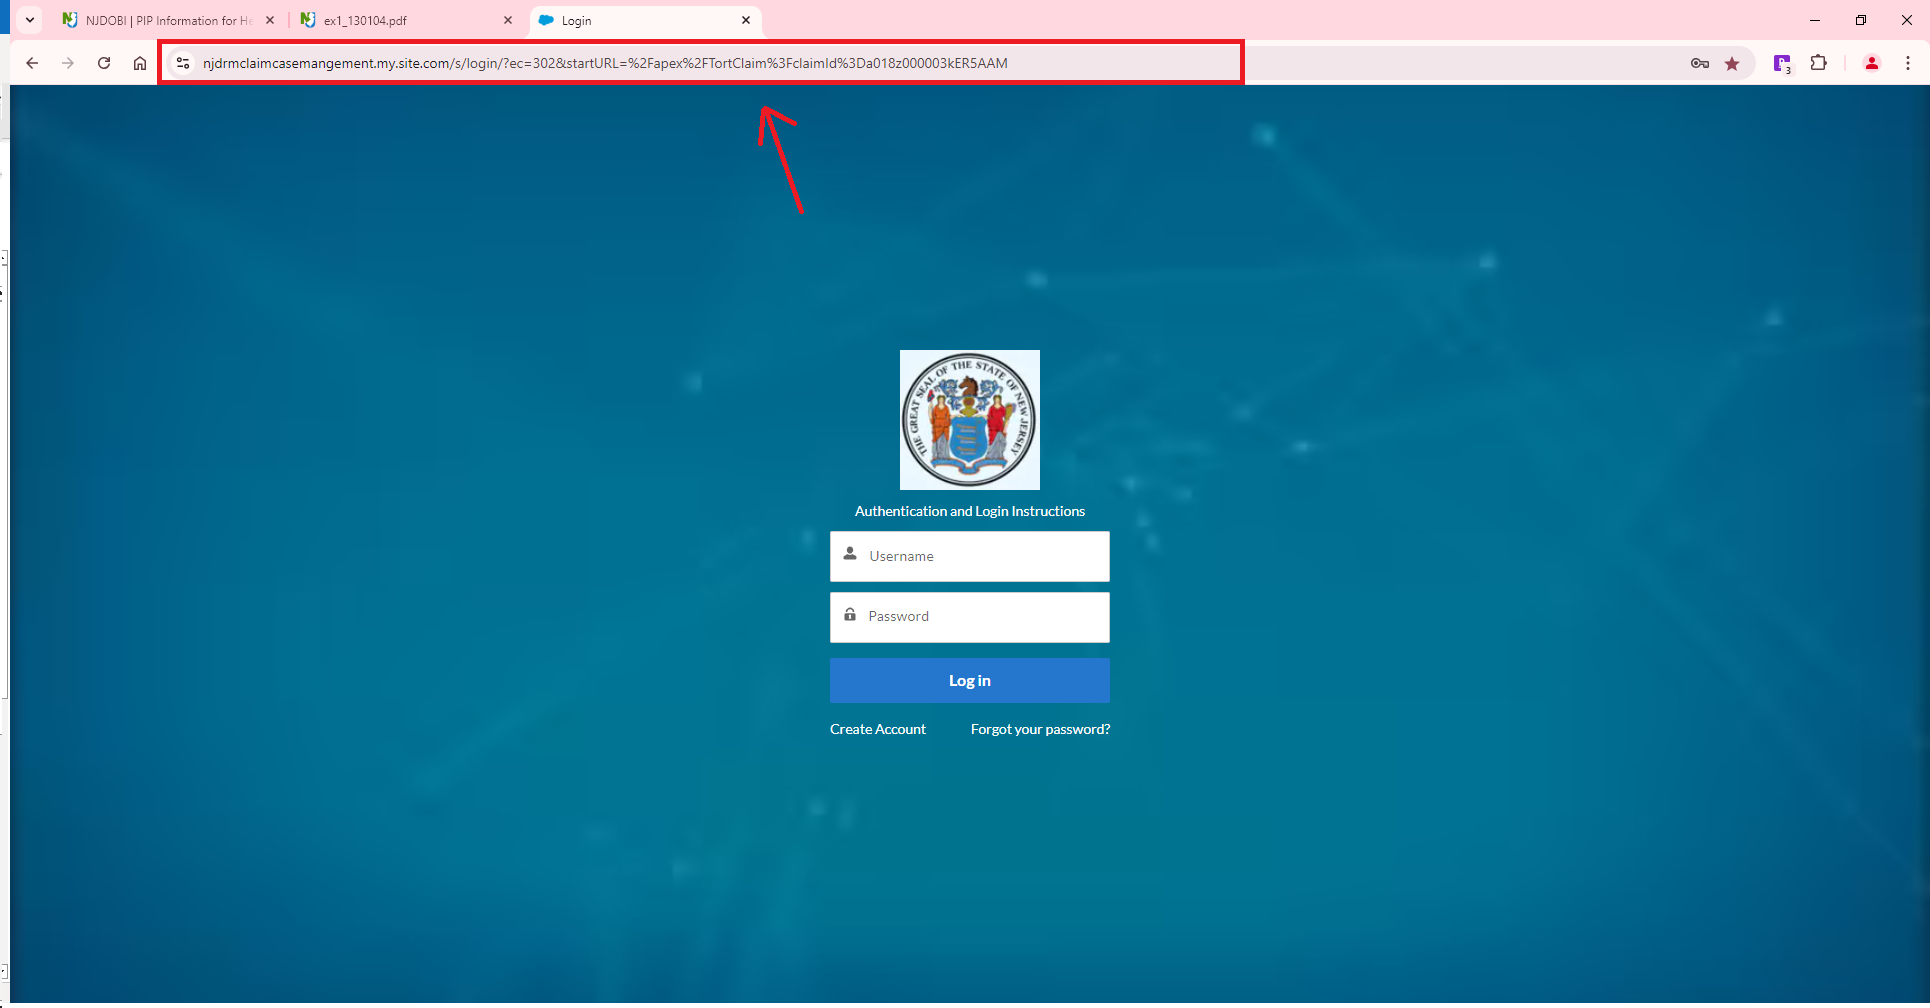
image 2

If you are experiencing an issue where the password reset link appears to be expired immediately after receiving it, please follow the steps below:
  1. After requesting a password reset, you will receive an email with a reset link.
  2. Do not click the reset link directly from the email. Instead, follow these steps to bypass potential browser caching or session problems:
    1. Copy the password reset link from the email.
    2. Open an incognito or private browser window:
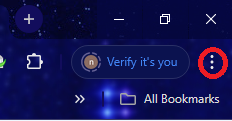
      • Google Chrome: Click the three dots in the top-right corner and select New Incognito Window.
      • Microsoft Edge: Click the three dots in the top-right corner and select New InPrivate Window.
      • image 3

    3. Paste the reset link into the incognito/private browser window.
    4. Proceed with the on-screen instructions to reset your password.
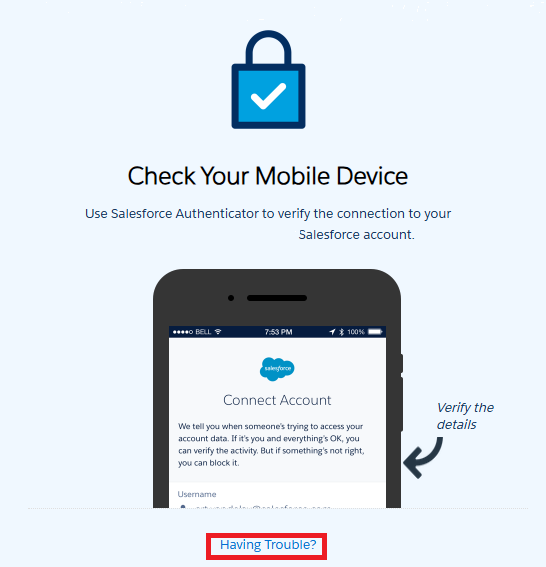
  3. During the reset process, you may be prompted by your authenticator app to approve the login request or enter a security code.
  4. If you do not receive authenticator notifications, click on "Having Trouble?" in your browser. You will then be able to manually enter the security code from your authenticator app to complete the reset process.
  5. image 4

First, refer to the tabs entitled “Preview Claim & Incident Categories”, “FAQ”, and the “How to File a Claim” tab, where you will find sample claim forms for reference purposes.
  1. First, make sure you have filled in all required fields and checkboxes on that page.
  2. Please note that you will not be able to get past the Claim & Incident Categories page until you have entered your initials and acknowledged that you have selected all of the claim categories that apply to your case. See Screenshot #1 below.
  3. Bodily Injury tab and page: You must select at least one (1) of the two (2) injury designation. Affected Body Part(s) and/or Diseases/Illnesses. See Screenshot #2 below.
  4. Claimants that selected “Property Damage” as one of the Claim & Incident Categories are required to access/open, and complete the blue tab entitled Add Property or Vehicle, in the Damages tab section of the intake form. See Screenshot #3 below.
  1. Remain on the Affected Page: If you encounter an error while submitting a claim or proceeding to the Next Page, please keep that page open.
  2. Access Developer Tools: Hit F12 key on the keyboard
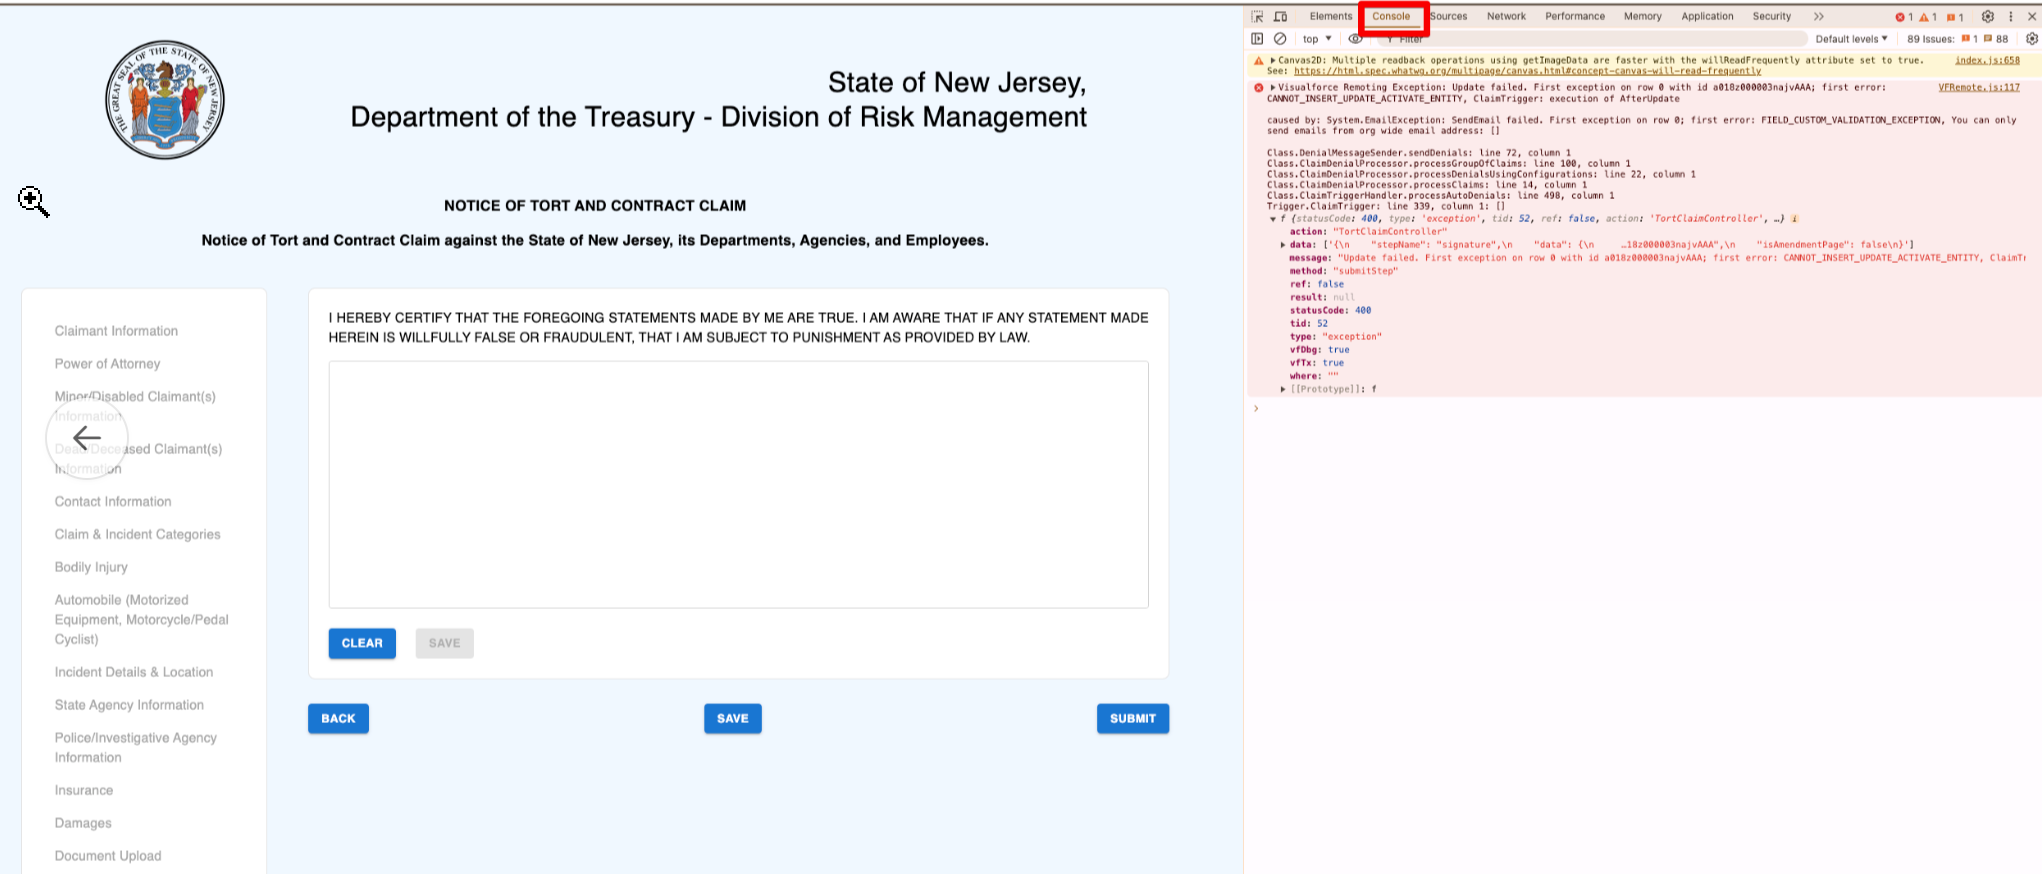
  3. Navigate to Console Tab: In the window that appears, select the “Console” tab as shown below in red.
  4. Capture the Screen: Take a screenshot of the page, ensuring the error message and any relevant information is visible, as shown in the screenshot above.

    image 5

    1. Windows -To take a screenshot press the "Windows Key + PrtScn" to capture the entire screen and save it to the "Screenshots" folder. Press "Alt + PrtScn" to capture the active window, and paste it using "Ctrl + V." You could also use the "Snipping Tool" for more options.
    2. Mac - To take a screenshot, press and hold these three keys together: Shift, Command, and 3. If you see a thumbnail in the corner of your screen, click it to edit the screenshot, or wait for the screenshot to save to your desktop.
    3. Chromebook - If your Chromebook has no Screenshot key: At the bottom right of your screen, select Settings. Screen Capture. Press Shift + Ctrl + Show windows .If your external keyboard does not have a Show windows key, press Ctrl + Shift + F5. You could also use the "Snipping Tool" for more options.
  5. Submit Error Report: Email screenshot to IT-Customer Service at CustSvc.RiskManagement@treas.nj.gov. Please include the following details:
    • Subject Section of Email: RCMS- Claim Submission Error, Claim No: Date of Accident
    • Body of the email: Claimants name; your full name; your email address
    • Attachment: Screenshot showing system error, as noted above.

Screenshot #1

Note that you will not be able to get past the Claim & Incident Categories page until you have entered your initials and acknowledged that you have selected all of the claim categories that apply to your case.
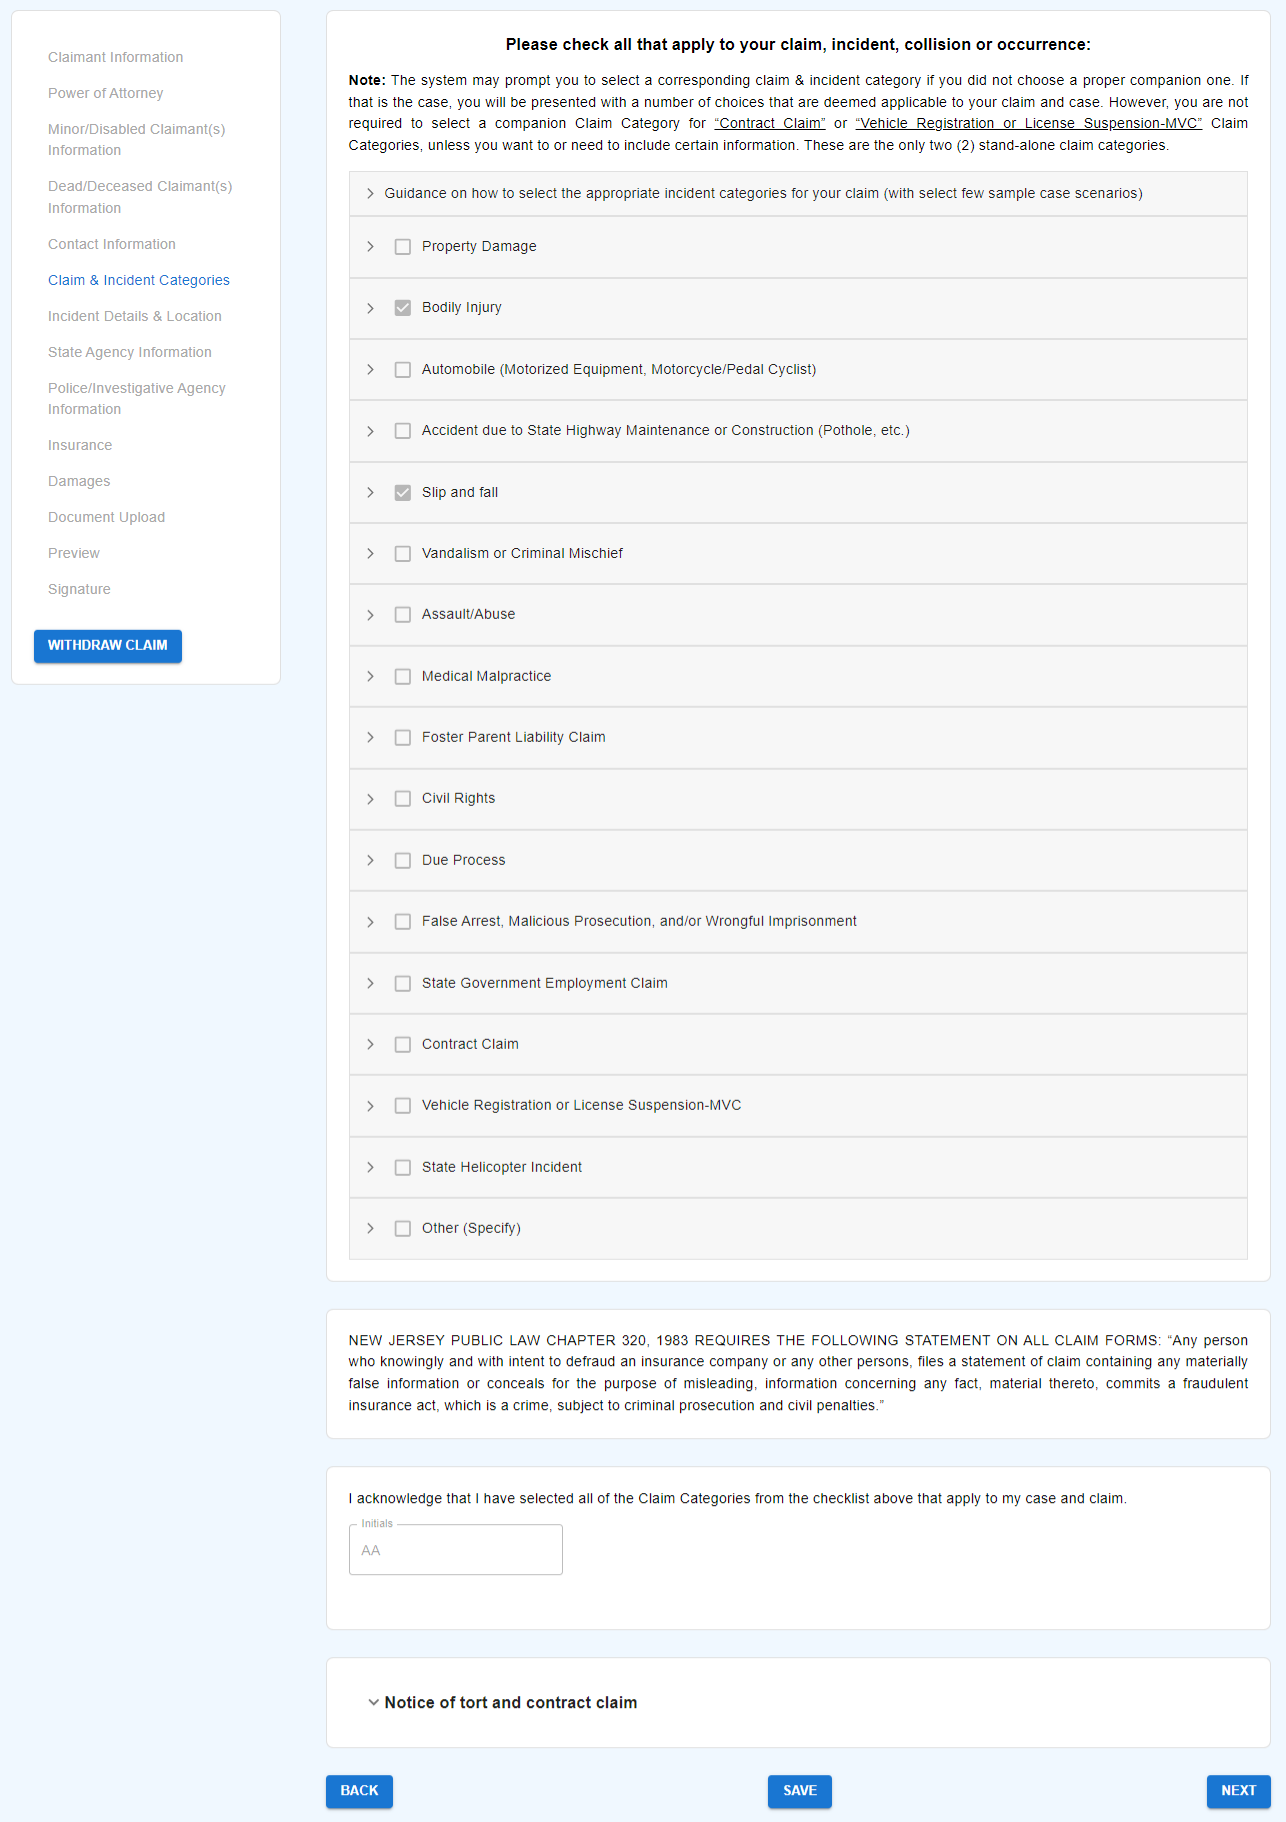
image 6

Screenshot #2

Bodily Injury tab and page: You must select at least one (1) of the two (2) injury designation: Affected Body Part(s) and/or Diseases/Illnesses.
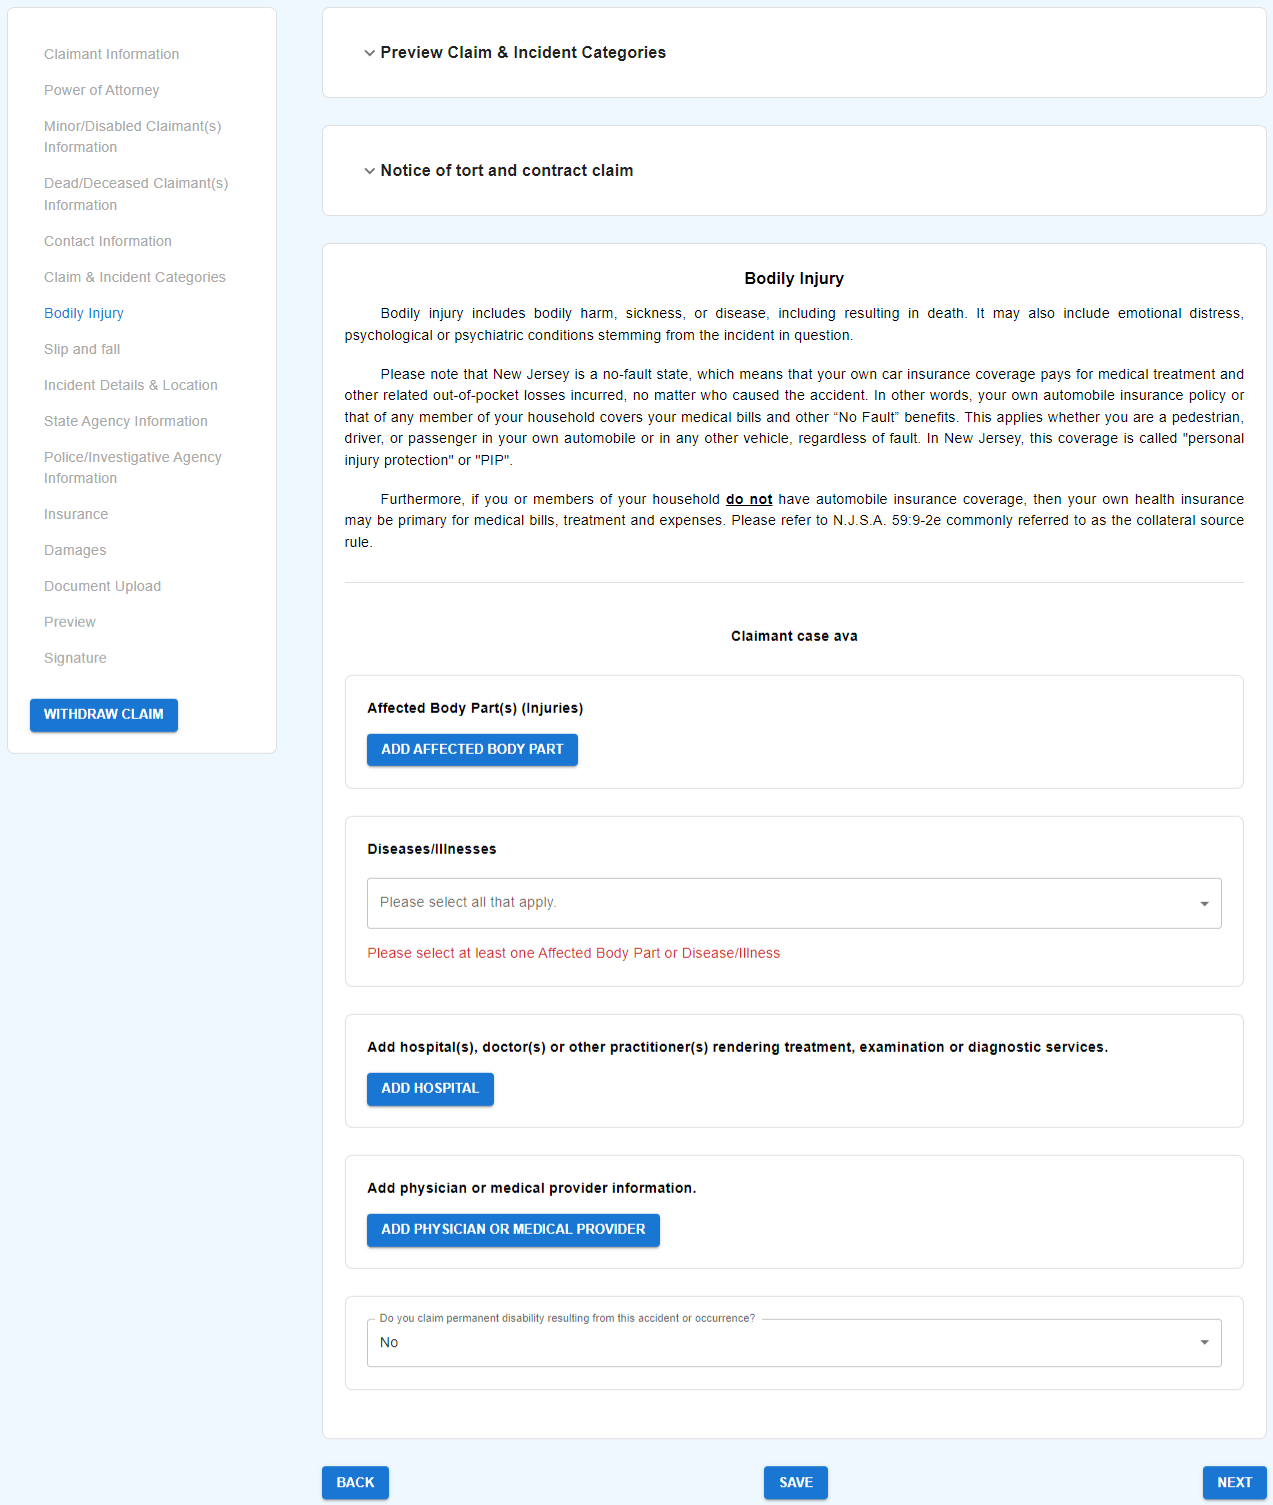
image 7

Screenshot #3

Claimants that selected “Property Damage” as one of the Claim & Incident Categories are required to access/open and complete the blue tab entitled Add Property or Vehicle, in the Damages tab section of the intake form.
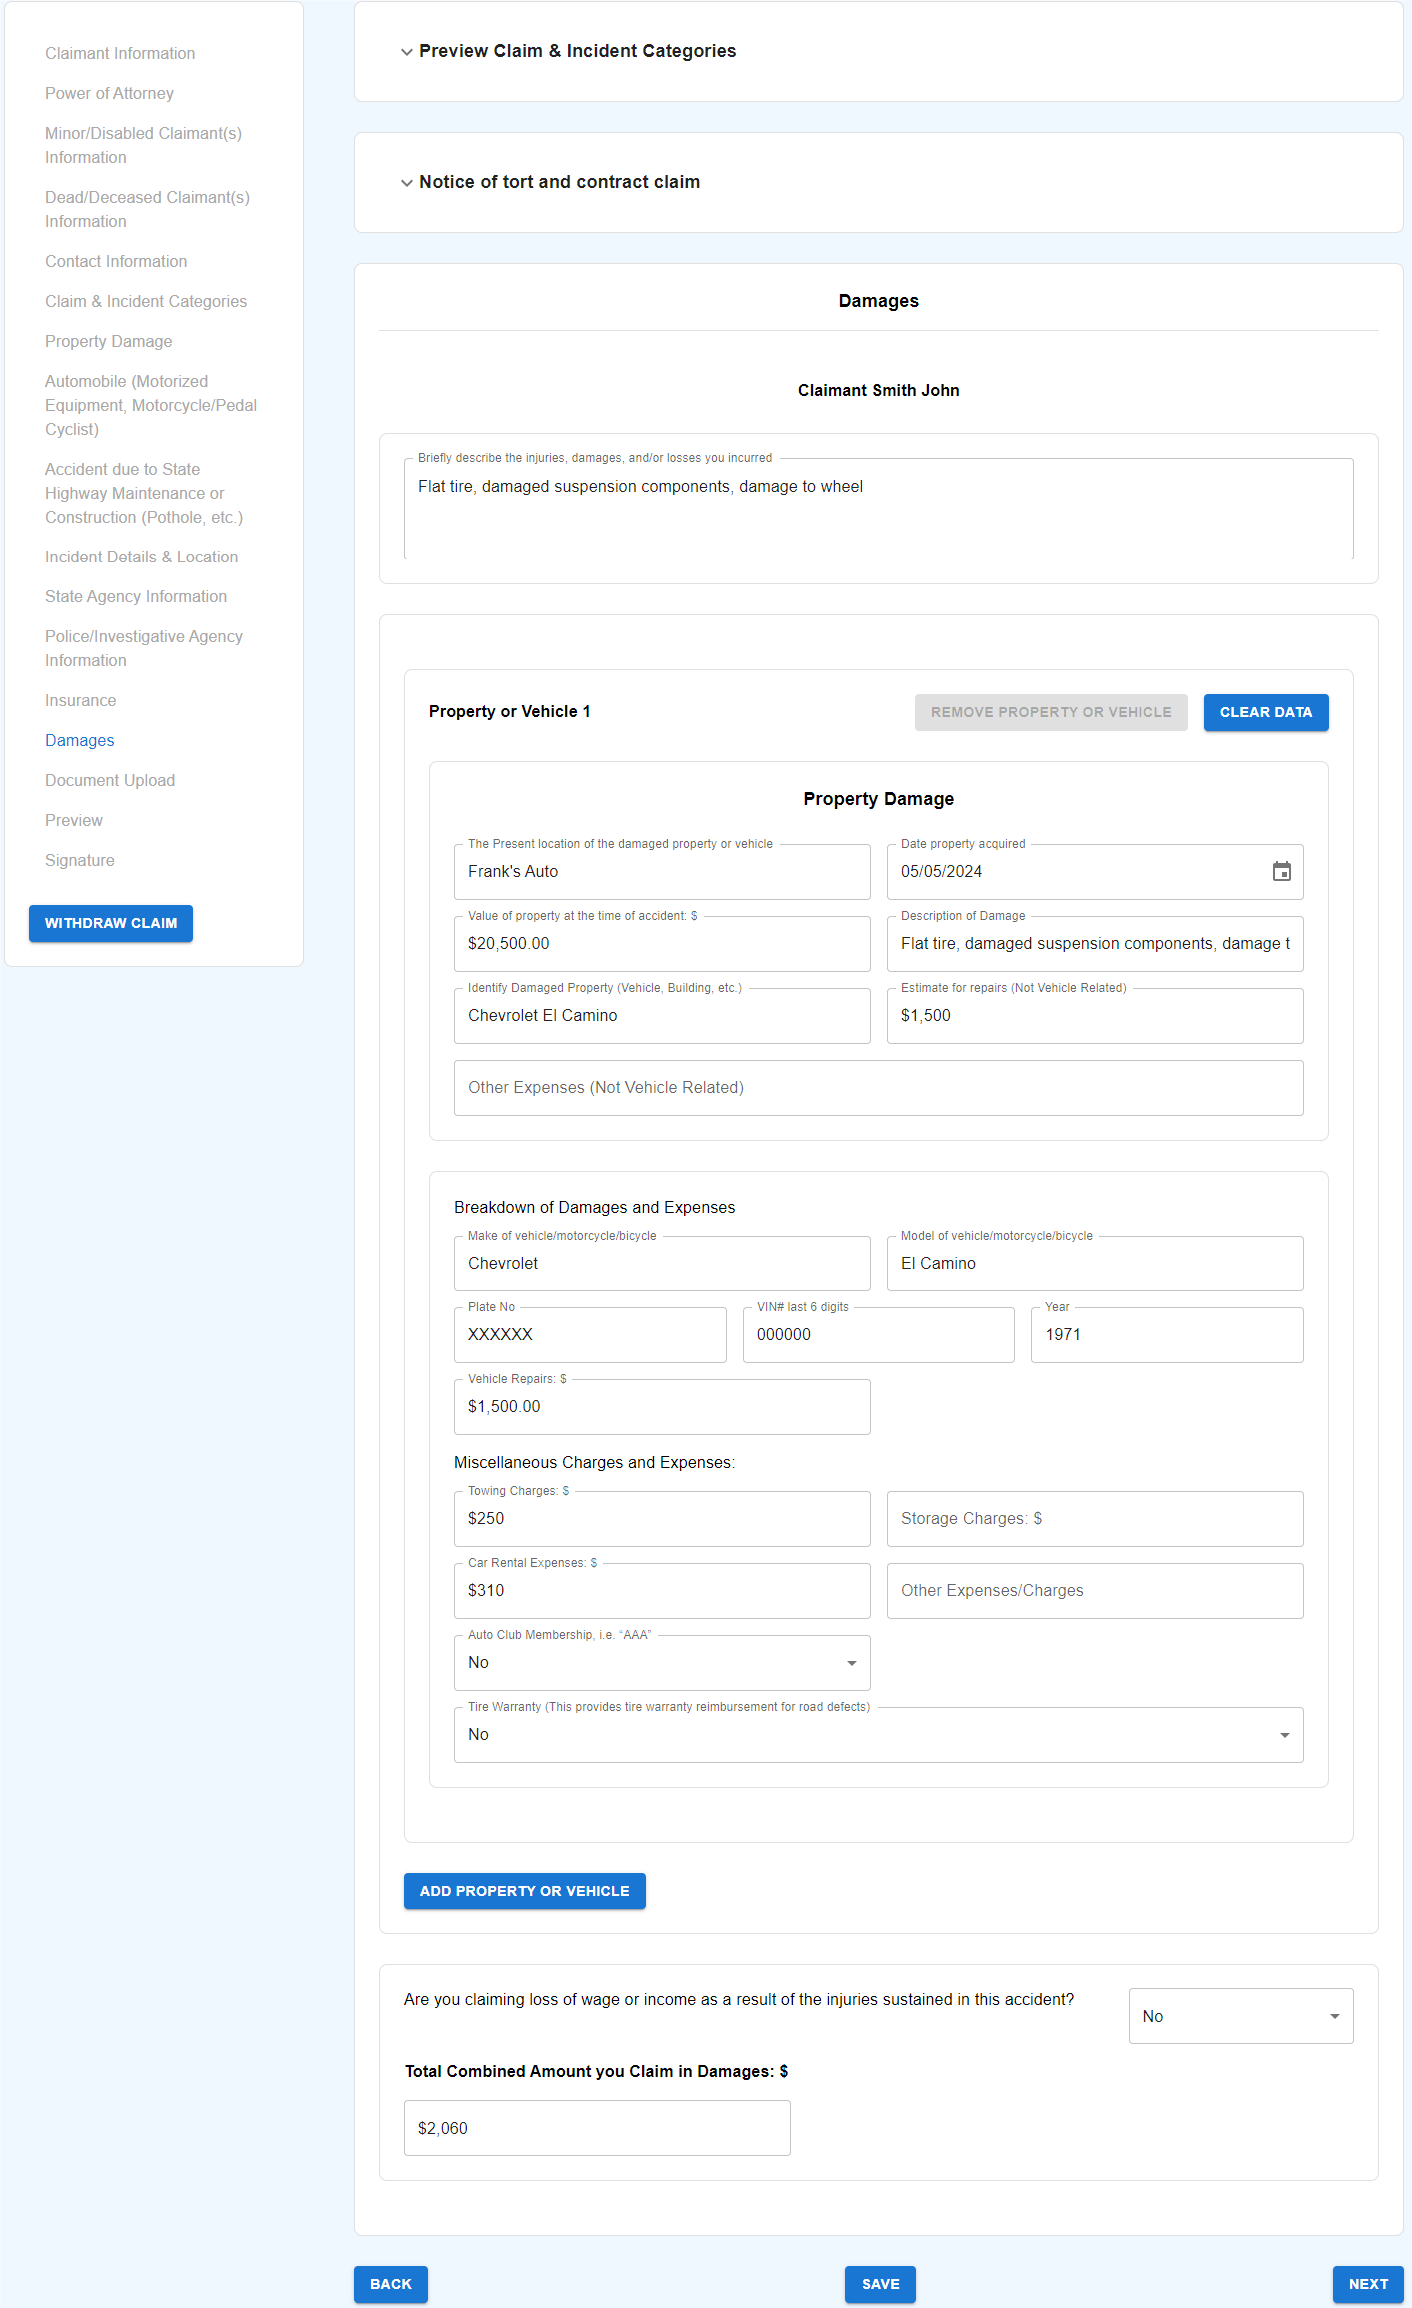
image 8

Join a Teams Technical Assistance Session, via the Microsoft Teams link below:

Schedule of Technical Assistance Sessions

Morning Session

Morning Session Link
Meeting ID: 215 327 875 186
Passcode: 5Jg9us7K

or

Dial in by phone
+1 856-338-7074,,752569443#
Phone conference ID: 752 569 443#

Mondays: 11:00 a.m. - 12:00 p.m.
Wednesdays: 11:00 a.m. - 12:00 p.m.
Fridays: 11:00 a.m. - 12:00 p.m.

Afternoon Session

Afternoon Session Link
Meeting ID: 278 127 493 157
Passcode: gx3hN7eq

or

Dial in by phone
+1 856-338-7074,,697045761#
Phone conference ID: 697 045 761#

Mondays: 3:00 p.m. - 4:00 p.m.
Wednesdays: 3:00 p.m. - 4:00 p.m.
Fridays: 3:00 p.m. - 4:00 p.m.

Given that we could be servicing and assisting another claimant/attorney, we ask that you stay in the lobby to keep your place in line.

OR

Email IT Customer Service for a written response within five (5) business days. Please ensure to upload a screenshot of the Claim Intake page in question, consistent with the instructions in item #4 on pages 4 and 5 of this document.

CustSvc.RiskManagement@treas.nj.gov


Last Updated: Wednesday, 04/23/25